So far, we've built a simple box model and set up a simple chemical mechanism to run in that box model. Now, we're going to make some final adjustments to make this a fully operational box model. In many cases, the host model needs to provide some information to CAMP that changes over the course of a model run. We've seen how to update environmental conditions like temperature and pressure, but other information requires some knowledge of the system being modeled. In the case of our simple mechanism, this is \(\ce{NO2}\) photolysis. CAMP photolysis reactions need to know the photolysis rate at a given moment in the model run. Other reactions that need some external help include emissions, first order loss, and wet deposition.
Let's update our box model to set the \(\ce{NO2}\) photolysis rate. Before the call to solver_initialize(), we'll add the following code:
We first find the chemical mechanism, which we named my simple mechanism in the last part of the tutorial. Next, we cycle through the reactions in that mechanism looking for rxn_photolysis_t reactions. Then, we check the properties of the photolysis reactions looking for a key-value pair name my photo label and make sure its value is NO2 photolysis, as we specified in the last section. The property_set of reactions gives you direct access to the input data for each reaction. This includes the information CAMP uses, like reactants and A, as well as those it doesn't use, like our my photo label. There are functions to get string, integers, real numbers, and subsets of properties from property_set. To see the available functions, see camp_property. The last step is to fix our rxn_update_data_photolysis_t object to the \(\ce{NO2}\) photolysis reaction we located, then at the end just make sure we found the reaction we were looking for. This and similar objects for other reactions that accept external updates allow you to change reaction parameters during a model run.
Finally, we'll add the following code before we start to loop over time and solve the chemistry:
Here, we simply set the reaction property of interest in our update data object, in this case the photolysis rate, and then pass this data to CAMP. This can be done before any call to solve(). This rate will remain the same until we change it again.
Now, our box model code and our input files are complete. To compile the code, try something like:
Where the include path points to where the CAMP library .mod files are installed. If you have trouble compiling or running because of missing libraries, make sure your LD_LIBRARY_PATH and PATH include the directories where the CAMP, json-fortran, SUNDIALS, and SuiteSparse libraries are installed.
Then, to run to mechanism:
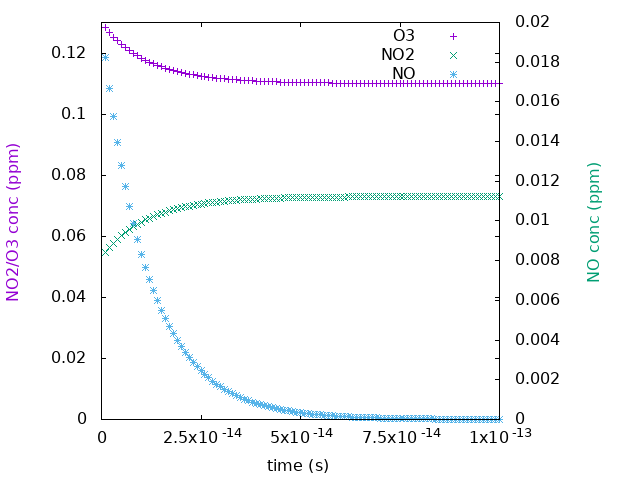
If you have gnuplot installed, you can copy /doc/camp_tutorial/boot_camp/part_3_code/plot.conf to the directory with your results and check out them out:
Our results look like this:
In the next installment of Boot CAMP, we'll start passing messages!
The files described in this part of the tutorial and needed to run the box model and plot the results can be found in /doc/camp_tutorial/boot_camp/part_3_code.
Docker Instructions
Inside the container:
Back outside the container:
< Previous: Boot CAMP: Part 2 - Mechanism ![]() Index
Index ![]() Next: Boot CAMP: Part 4 - Message Passing >
Next: Boot CAMP: Part 4 - Message Passing >